Showing posts with label Then and Now. Show all posts

10.03.2012

Then & Now: The Office


Continuing along with our tour through the progress we've made on the house in the first two years, which very well may take until we've lived here for three years to complete, here's a look at our office/guest room. It's a very bright, sunny room with the nice double window that looks out over the front yard. That's one reason why we chose it for the office instead of the nursery, thinking that the room in the back corner would ultimately be better for nap time. And since this room now needs to serve double duty as our office and space for guests, it's nice that it's the bigger of the two other bedrooms in the house. 


As you can see, when we moved in, this room was that lovely pale yellow, just like every. other. room. in the entire house!


Here's what it looked like after we added our new desks last fall, but before we got rid of the yellow. The light wood looked lost against that awful color.


But it pops nicely against the bright, cheery green we chose. 


Here's a reminder of the old hand-me-down tables we were using as desks before we got the new ones. 


And another angle of the Ikea solution that replaced them. 


This is what it looked like before we managed to fill the open shelves up with stuff.


Here's the other window in the room that looks out toward the side yard of the house. We had quite a conglomeration of metal storage shelves, and big clunky and rusty file cabinet, all of which drove me a bit crazy with their mismatched feeling. 


After we installed the first batch of new furniture from Ikea, which included file cabinet and new white shelf under the window, we still used the old metal shelves while we waited to sort out what the closed storage solution on the wall was going to be. You can see from this photo that this room serves a lot of purposes, and really needed some help!


Here's the current solution, with the overhead storage cabinets now containing most of the crafty stuff, and giving us some more open storage above (which admittedly, still needs attention!) We were able to design a solution that fit perfectly around my old couch, which had been living in my mom's basement since I moved in with Greg six years ago. The couch blocks some of the shelves in the corner, but we're using those to mostly store the linens and pillows for guests. The back cushions come off the couch very easily to allow access to those shelves, and to turn the couch into a twin sized bed. In addition to that, the top cushion can fold forward onto the floor creating a queen sized mattress on the floor. It turned out to be a perfect solution for a flexible office guest room. 


And, since I don't have any now shots of the closet wall, here's a reminder of what that looks like. You can see from the first photo that there is some wall space to the right of the closet. You can get the slightest glimpse of a ledge inside the closet, behind that wall. Because our house is a split level, that ledge is actually the ceiling of the coat closet half a level down by the front door. It drives us a little bit crazy that there is a whole bunch of storage space, just waiting to be utilized. We have talked about opening up that wall, above the height of the ledge to create an open shelving solution of some sort, perhaps to house the TV and the printer which now live on metal shelves in front of that space. Who knows when we'll get there though. 

So, to recap...

What did we do?
  • New desks, rolling drawers, file cabinets, wall shelves, wall mounted cabinets
  • Added the couch
  • Painted
What's left?
  • Real window treatments, to replace that paper ones that are still up, and badly needed for privacy. We'll probably go with wood blinds like the ones in the master, but in in white instead. 
  • Bust through the wall next to the closest as described above
  • Paint the trim, and touch up the paint in general
  • Add a modern closet system to maximize storage inside the closet
  • Get rid of the white plastic drawers under my desk (mostly containing my make-up which will move to it's new home in the dressing table in the master)
  • New light fixture
  • Hang art and a magnetic white board
  • Organize the open storage on top of the wall cabinets
  • Split system air conditioner to serve both bedrooms on this level


9.26.2012

Then & Now: The Master Bedroom


It's time for another installment of Then & Now. This time featuring the master bedroom.  It was a pretty blank pale yellow canvass when we moved in.


For some reason, I never take shots looking back toward our wall of doors. Probably because that's where we hide the mess, hanging from various over the door hooks, which pretty much keep our closet doors from ever being completely closed, and because I'm not entirely satisfied with the shoe storage solution that we have going on. So, this is just a reminder at what the wall opposite the windows looks like. 


Lastly, a before and after on my dresser solution that we replaced with a nice new grown up bureau. We ended up using my old maple chest of drawers in Luigi's room. It had been dinged up over the years, but is very well constructed, and should last a lot longer, so a fresh coat of paint did it justice, while I got to benefit from a solution that finally complimented the rest of the room!


So here's the breakdown...

What did we do?
  • Refinished the floors
  • Paint (Greg and his brother would both argue that I should have left the sloped portion of the wall/ceiling white instead of purple. I hold firm that I made the right decision. I think it would be especially weird behind the armoire to have a high contrast line between white and purple)
  • Window treatments - both wooden blinds and curtain
  • New bureau
  • Refinished my Gram's dressing table
  • Reconfigured Greg's closet to allow access into the attic (not shown)
  • Lights added to both closets (not shown)
  • Insulated the storage eaves (in the eave behind the dresser)
  • Added the old sage green recliner from the living room with a new red slip cover. (It's now Siegfried's favorite place to sleep at night.)
What's left?
  • Carpet. Probably carpet tiles in a few areas. Greg doesn't love carpet. I don't love carpet covered in cat hair, but I also don't love putting my feet on a cold floor in the middle of winter!
  • New light fixture. Ceiling fan maybe?
  • New finials on the curtain rod (try not to notice that the ones up there are blue!)
  • Paint the trim, and touch up all the paint
  • Shoe storage solution, perhaps built-in along the outside for Greg's closet
  • New upholstery on the cushion at the dressing table
  • New bedside lamps
  • Art on the walls
  • Very long term: bump up the eaves storage to create a master bathroom and walk-in closet


9.23.2012

Then & Now: The Dining Room


Continuing the look back at where were started, and where we are after two years in our house, this week, I bring you back to the dining room, again set up for our fourth of July party earlier this summer. 


Our dining room furniture was well established when we moved in, so the biggest transformation in this room has simply been the pain color. 

What did we do?
  • paint
  • add lighting to the storage cabinets
  • hung art on the wall


What's left?
  • more art
  • new wine storage
  • possibly a lower more high-chair/family friendly table
  • a new light fixture? there's nothing wrong with the one that's there, but it's not extremely interesting
  • a new screen door 
  • a new exterior door that is actually insulated
  • window treatment? not sure if we need it
  • a split system air conditioning unit house outside that will vent into the dining room to cool the main floor, and above to our bedroom


8.17.2012

Then & Now: The Kitchen


As previously mentioned, in honor of being in Kingston Road for two years, I'm taking a look back at some of the transformation we've undertaken so far. The now pictures were taken on the fourth of July when the house was ready for the party we threw, and was about as staged as it gets (minus the party prep) aside from Christmas. It was a good time to grab some shots. 

The kitchen transformation is not as dramatic visually as the living room, with the exception of the counter and cabinet that we added in one corner. But, we did also add a lot of pull out wire drawers inside all of the cabinets that have drastically increased the storage capacity of the kitchen. 

New Counter Area:


Fridge Corner:


So what did we do in the kitchen?
  • new cabinet with drawers and new counter top
  • pull out wire drawers in almost all the existing cabinets
  • new microwave hood above the cook top
  • paint


What's left?
  • light fixture above the sink
  • finish the edge of the cabinet to hide the exposed side of the microwave
  • install one more wire drawer in far corner cabinet to right of sink
  • find a better storage solution for pot lids
  • and way down the road...redo the whole thing!


8.10.2012

Two Years Later (Then & Now: The Living Room)


Two years ago today, Greg and I closed on our house on Kingston Road. It's hard to believe it's been two years already, but it also seems like we can't remember it any other way. The day after we closed, we headed off to Martha's Vineyard to spend some time relaxing while we got the floors refinished before moving in. It seems fitting that we are again on the island for a last getaway before Luigi arrives this fall. 

In honor of the two years we've been in the house, I thought it would be fun to do a series of posts looking back on all the progress that we've made in the last two years. It seems that we don't often stop, and when we look back at all we've accomplished, it's easy to see why. 

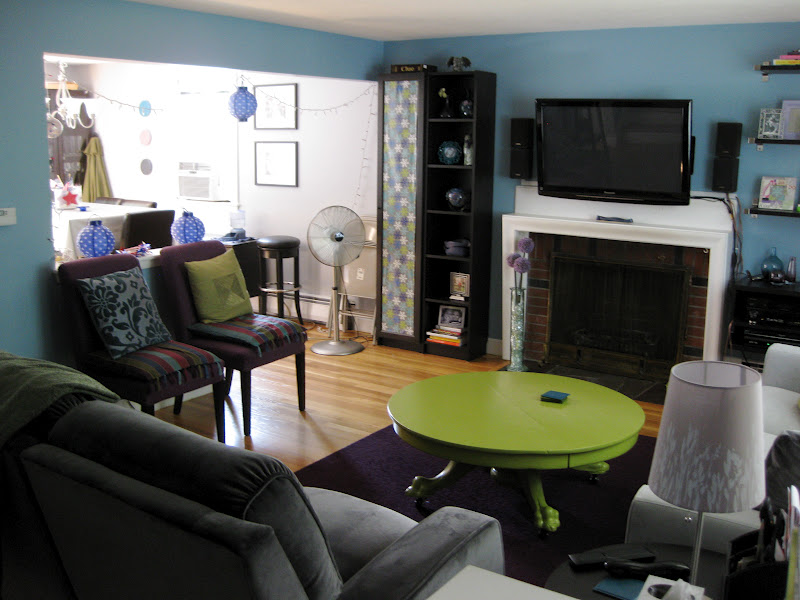
I know I have a lot of catching up to so with the deck project and the baby's room. I will work on weaving those in as well. But for now, please enjoy the first installment of "Then & Now." I decided this was a better title than "Before & After," because our house still is, and probably always will be, a work in progress. So, without further ado, here's a look back at the living room before and since we moved in, and how it was looking this year on the fourth of July, when the house was a close to staged as it gets (aside from Christmas). 

The Big Window:


The Fireplace Wall: 


View from the Stairs:


View toward the Stairs:


It's hard to believe it's that same pale yellow room we walked into two years ago. Here's a run down of of some of the things we did:

  • refinished floors
  • paint 
  • window treatments
  • hung TV and speakers on wall
  • added shelves and entertainment until to right of TV
  • new lamp shades
  • replaced recliner with double reclining love seat
  • replaced white slipcovers on side chairs with purple ones
  • replaced coffee table with freshly painted green table from Gram's house
  • started (but not nearly finished) accessorizing (work in progress...right?!)


Things still on the to do list:

  • expand the purple carpet by at least one row of tiles
  • find better lighting for reading in the love seat
  • cable management for the TV and entertainment unit
  • hang art going up the stairs
  • accessorize the shelves on either side of TV in a more thoughtful way
  • update/add photos to frames
  • find a permanent solution for the covering the glass door of the tall cabinet for hidden storage
  • paint the trim and fireplace white
  • paint the top "back splash" of the mantel the same color as the wall
  • paint or tile over the brick of the fireplace
  • add the back speakers of the surround sound system
Yeah, so there's still a few things on the list. We not succeed in hitting my mom's suggested 3 year decorating plan, since this next year is destined to be more baby than house focused. But that's ok. I think we've accomplished quite a bit already. And it definitely feels like home!