8.17.2012

Then & Now: The Kitchen


As previously mentioned, in honor of being in Kingston Road for two years, I'm taking a look back at some of the transformation we've undertaken so far. The now pictures were taken on the fourth of July when the house was ready for the party we threw, and was about as staged as it gets (minus the party prep) aside from Christmas. It was a good time to grab some shots. 

The kitchen transformation is not as dramatic visually as the living room, with the exception of the counter and cabinet that we added in one corner. But, we did also add a lot of pull out wire drawers inside all of the cabinets that have drastically increased the storage capacity of the kitchen. 

New Counter Area:


Fridge Corner:


So what did we do in the kitchen?
  • new cabinet with drawers and new counter top
  • pull out wire drawers in almost all the existing cabinets
  • new microwave hood above the cook top
  • paint


What's left?
  • light fixture above the sink
  • finish the edge of the cabinet to hide the exposed side of the microwave
  • install one more wire drawer in far corner cabinet to right of sink
  • find a better storage solution for pot lids
  • and way down the road...redo the whole thing!


8.10.2012

Two Years Later (Then & Now: The Living Room)


Two years ago today, Greg and I closed on our house on Kingston Road. It's hard to believe it's been two years already, but it also seems like we can't remember it any other way. The day after we closed, we headed off to Martha's Vineyard to spend some time relaxing while we got the floors refinished before moving in. It seems fitting that we are again on the island for a last getaway before Luigi arrives this fall. 

In honor of the two years we've been in the house, I thought it would be fun to do a series of posts looking back on all the progress that we've made in the last two years. It seems that we don't often stop, and when we look back at all we've accomplished, it's easy to see why. 

I know I have a lot of catching up to so with the deck project and the baby's room. I will work on weaving those in as well. But for now, please enjoy the first installment of "Then & Now." I decided this was a better title than "Before & After," because our house still is, and probably always will be, a work in progress. So, without further ado, here's a look back at the living room before and since we moved in, and how it was looking this year on the fourth of July, when the house was a close to staged as it gets (aside from Christmas). 

The Big Window:


The Fireplace Wall: 


View from the Stairs:


View toward the Stairs:


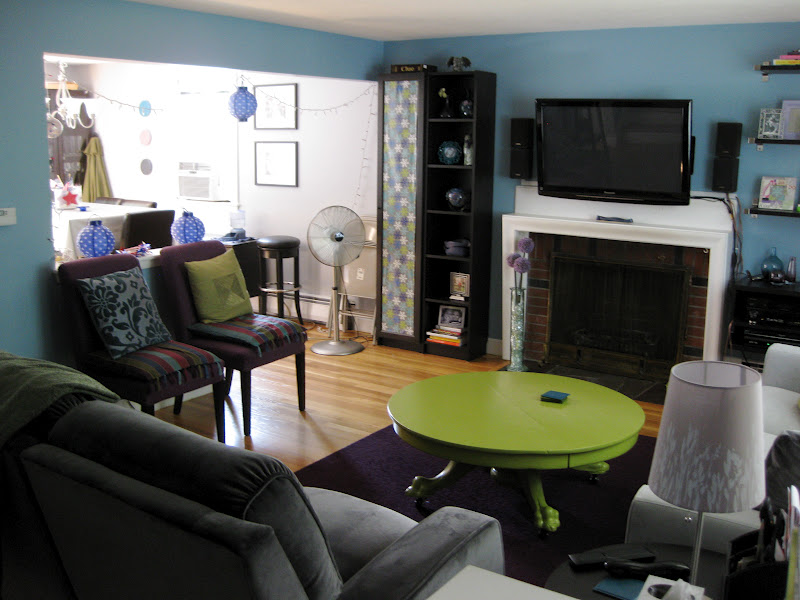
It's hard to believe it's that same pale yellow room we walked into two years ago. Here's a run down of of some of the things we did:

  • refinished floors
  • paint 
  • window treatments
  • hung TV and speakers on wall
  • added shelves and entertainment until to right of TV
  • new lamp shades
  • replaced recliner with double reclining love seat
  • replaced white slipcovers on side chairs with purple ones
  • replaced coffee table with freshly painted green table from Gram's house
  • started (but not nearly finished) accessorizing (work in progress...right?!)


Things still on the to do list:

  • expand the purple carpet by at least one row of tiles
  • find better lighting for reading in the love seat
  • cable management for the TV and entertainment unit
  • hang art going up the stairs
  • accessorize the shelves on either side of TV in a more thoughtful way
  • update/add photos to frames
  • find a permanent solution for the covering the glass door of the tall cabinet for hidden storage
  • paint the trim and fireplace white
  • paint the top "back splash" of the mantel the same color as the wall
  • paint or tile over the brick of the fireplace
  • add the back speakers of the surround sound system
Yeah, so there's still a few things on the list. We not succeed in hitting my mom's suggested 3 year decorating plan, since this next year is destined to be more baby than house focused. But that's ok. I think we've accomplished quite a bit already. And it definitely feels like home!

7.08.2012

It's time to do the nursery


In case you haven't heard yet, Greg and I expecting a baby boy this October! We beyond thrilled! And of course, this opens up a whole new realm of home improvement projects. So, yes, I will admit, while Greg has been busy building the deck all spring, I have been doing a lot of napping in the hammock, but I have also been doing a lot of prep work on our son's nursery. I thought I'd share a little preview of what we're planning so far. Oh, and in the images below, you'll see we've given him the nickname "Luigi" so we can call him something more interesting than "the baby" before he gets here and we decide on an official name. (and no, we won't be sharing our list until he's actually here!)

First, here's a mood board of sorts showing the feature wall. The other three walls will be the light aqua color, which is pulled from the bedding. The bedding is Blue the Morning  Zoo from the Land of Nod. The crib is the Hudson from Babyletto, and the curtains are blackout curtains that match the green in the bedding, from many sources online. The rocking chair is an antique Victorian chair I got from my grandparents house, which my mom has been kind enough to store for me for the last decade. We plan to paint it white and reupholster it, which should be interesting, since we're essentially rebuilding it from scratch. It was literally filled with hay and horsehair! There are two windows in the room. One opposite the feature wall, and one to the left of it. The crib will nestle in between the windows. The last wall, to the right of the door is mostly just the white closet doors. 


OK, so you got it?


The tall chest of drawers is my old piece. It's a sturdy natural maple chest that I've had since I was a teen. We just got a new dresser for our bedroom that finally coordinates with the rest of our furniture...which hopefully I will get around to showing you someday. So yes, I have no problem painting natural wood. My first thought was to paint it to match the stripes on the wall, and almost camouflage it in. 


But, then I wasn't sure if it stood out enough. So, I looked at painting each individual drawer it's own color, and something that would intentionally be different than the wall stripe behind it. I think this makes it pop a bit more. 


Lastly, I love the idea of some large scale animal silhouettes that Luigi can relate too, so maybe one would work on the drawers? Especially since we're just not going to end up with a heck of a lot of bare walls at his height. At first I thought I would paint it on. But then I reminded myself about the decals, which will make it much easier to get rid of when we're mature enough to move on from zoo animals. 

The room has hardwood floors, so we want to put down some type of area rug. I am absolutely in love with carpet tiles. They have been awesome with our cats when there is a mess. We just pick it up, spray it off in the sink, let it dry, put it back. This seems like it would be a great feature in a kids room too. Not to mention that they are so easy to move around, change up the pattern, or take with you when you leave. It's pretty much a definite that we will use them here. I just have to come up with a design. I'm thinking of creating stripes on the floor with the carpet, that will run parallel to the ones on the wall, almost making it look like the wall stripes folded down onto the floor and across the room. What do you think? Too many stripes? I tend to use a lot of patterns, and mix and match. I always think it might be too much, but it hasn't yet...Maybe a checker board of just two colors, or a solid field with a contrasting boarder?

Let me know what you think. Which dresser do you like best? Thoughts on carpet patterns? Ideas where I can find a fun and colorful graphic zoo animal mobile?

And never fear, I still have tons of pictures to share of how the deck is coming along. It's all finished up top now. We just hosted two parties this week with 15 & 16 people, and everyone fit! Greg is still hard at work on the next phase...the shed enclosure. 


6.19.2012

Cutting Rubber

The weekend after Mother's Day, my mom was kind enough to come and visit us so Greg could keep working on the deck framing. She did a lot of great yard work for us while she was here, but Greg also put us to work cutting the rubber roofing which you can see in the foreground. 


The rubber roofing is needed to waterproof the shed that will be under the shed. Greg came up with the idea to cut it into trapezoids, one for each space between two joists. When the trapezoids are fastened to the tops of the joists, there will be a natural slope away from the house to collect all the water that come through the decking, and direct it to a gutter at the far end of the deck.


I carefully measured out the spacing for the trapezoids, then the three of us snapped chalk lines, and my mom and I raced to see who could cut more sections the fastest. My mom is very competitive, so we got the job done fast!


6.15.2012

A Deck Frame of Mind

The weekend of Mother's Day, we had originally planned to head to New York to visit my mom. But because of weather, and other weekends away, we postponed the trip so that some real progress could be made on the deck. Greg new he had to make the most of the weekend we didn't go to visit my mom, so he set about beginning the framing. 


The first step was to attach the ledger beam to the house.


Doug was back to help attach all the joist hangers to the beam. 


And later on, George arrived as well to help get the posts and carrying beams in place. It was actually beginning to look like it might turn into a deck someday. 


Meanwhile, the debris pile in what used to be our patio continued to grow. Maybe we'll get that patio back next year!